


Introduction
The Unified Modeling Language (UML) serves as the universal visual language of software engineering, bridging the gap between abstract architectural concepts and concrete implementation details. At the heart of every class diagram—the most fundamental and widely used component of UML—lies the UML class box. This simple yet powerful visual representation encapsulates a software entity’s structure, behavior, and responsibilities.
Whether you are architecting a massive enterprise system, designing a microservice architecture, or sketching a quick prototype for stakeholder alignment, understanding how to properly structure and customize the UML class box is essential for clear communication. While many developers rely on code-first approaches, well-crafted UML diagrams remain invaluable for onboarding new team members, documenting design decisions, and facilitating cross-functional discussions.
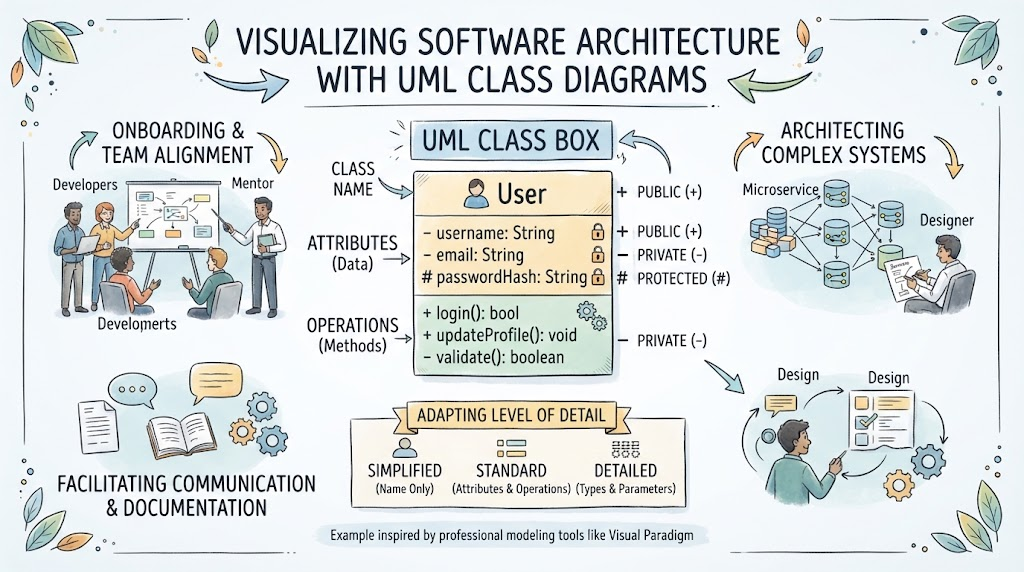
This guide breaks down the standard notation for a UML class, explores how to adapt its level of detail to fit your audience, and provides practical examples using Visual Paradigm, a professional-grade modeling tool that offers robust features for creating, managing, and collaborating on UML diagrams. By mastering both the theoretical foundations and practical applications, you’ll be equipped to create diagrams that effectively communicate your software design intent.
Key Concepts
Before diving into the visual notation, it is important to understand the core terminology associated with UML classes:
-
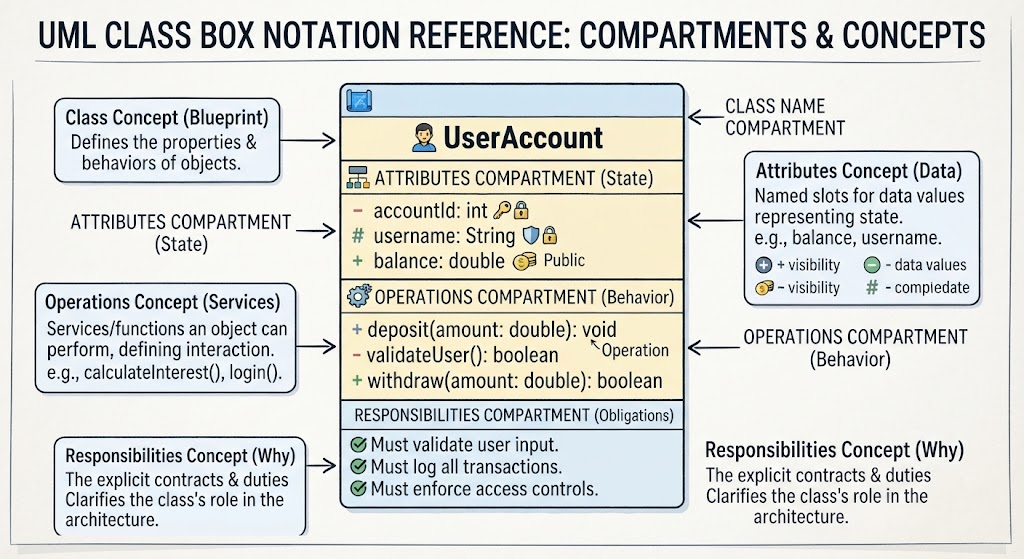
Class: A blueprint or template for creating objects. It defines the properties (attributes) and behaviors (operations) that the objects created from the class will have. In object-oriented programming, a class is the foundational unit of abstraction.
-
Compartment: A distinct, horizontally divided section within the UML class rectangle used to separate different types of information. The standard class box contains three compartments, but additional compartments can be added for specialized information.
-
Attributes: The named slots for data values. They represent the state or properties of the class (e.g.,
balance,username,orderId). Attributes define what data an object holds in memory. -
Operations: The services or functions that an object of the class can perform. They represent the behavior or actions the class can execute (e.g.,
calculateInterest(),login(),processPayment()). Operations define how an object interacts with other objects and modifies its state. -
Responsibilities: The explicit obligations, contracts, or duties that one class has toward other classes or the system as a whole. Responsibilities clarify the “why” behind a class’s existence and its role within the broader architecture (e.g., “Must validate user input,” “Must log all transactions”).
Understanding these concepts ensures that your diagrams are not just visually correct but also semantically meaningful, enabling effective communication among developers, architects, product managers, and stakeholders.
The Standard UML Class Notation
By default, the standard UML notation for a class is represented as a single rectangle divided into three distinct compartments, stacked vertically from top to bottom. Each compartment serves a specific purpose and follows established formatting conventions.
1. Top Compartment: The Class Name
-
Content: Contains the name of the class.
-
Formatting Rule: The class name must always be written in boldface type to make it stand out as the primary identifier of the box. If the class is abstract, the name is typically italicized. If the class is an interface, it may be prefixed with
<<interface>>or displayed with a different stereotype. -
Purpose: Instantly tells the reader what entity is being modeled. The class name should be a noun or noun phrase that clearly describes the entity’s role in the system (e.g.,
BankAccount,User,OrderManager).
2. Middle Compartment: Attributes
-
Content: Lists the attributes that belong to the class.
-
Purpose: Defines the data structure and state. Attributes are essentially named slots for data values that the object will hold in memory (e.g., variables, properties, or fields in code).
-
Notation Details:
-
Visibility Modifiers: Attributes are prefixed with symbols indicating their visibility:
-
+for public -
-for private -
#for protected -
~for package/default
-
-
Type Specification: Each attribute includes its name followed by a colon and its data type (e.g.,
accountNumber : String,balance : Double). -
Optional Default Values: Default values can be specified after an equals sign (e.g.,
status : OrderStatus = PENDING).
-
3. Bottom Compartment: Operations
-
Content: Lists the class’s operations.
-
Purpose: Defines the behavior. Operations represent the services that an object of that class can request or execute to affect its behavior or interact with other classes (e.g., methods or functions in code).
-
Notation Details:
-
Visibility Modifiers: Similar to attributes, operations use visibility prefixes (
+,-,#,~). -
Signature: Each operation includes its name, parameter list (with types), and return type (e.g.,
+ deposit(amount : Double) : void,+ withdraw(amount : Double) : boolean). -
Abstract Operations: Abstract operations are typically italicized.
-
Customizing the Class Box: Variations and Extensions
While the three-compartment box is the gold standard for detailed design documentation, UML is designed to be a flexible communication tool. You should tailor the level of detail in your class boxes based on your audience, the stage of development, and the specific goal of the diagram.
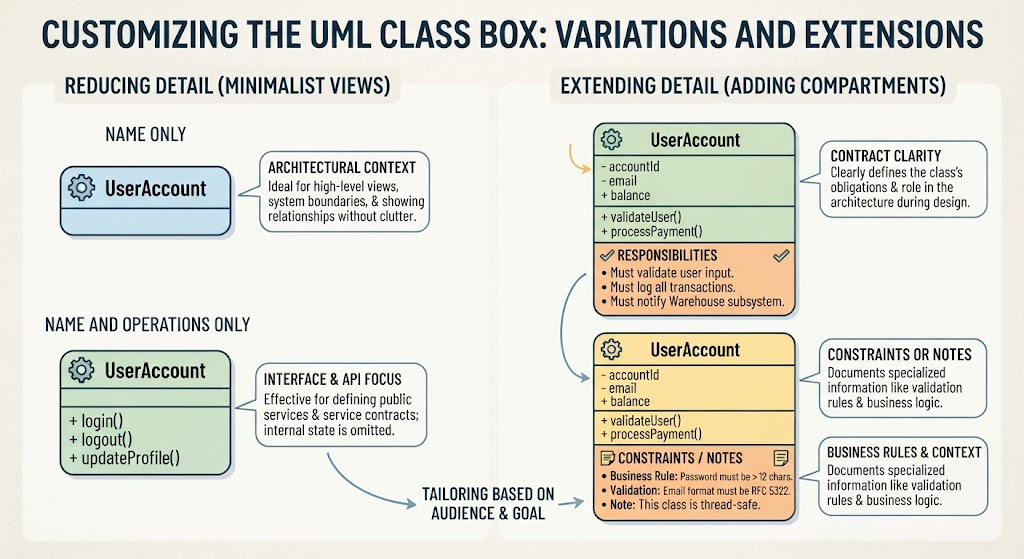
Reducing Detail (Minimalist Views)
When designing high-level architectural diagrams, showing every attribute and operation can create visual clutter and distract from the broader structural relationships. In such cases, you can choose to show a class box with less detail:
-
Name Only: Useful for showing the overall structure and relationships between many classes without getting bogged down in implementation details. This is ideal for context diagrams, high-level architecture overviews, or when discussing system boundaries.
-
Name and Operations Only: Useful when the behavior and public API of the class are more important to the discussion than its internal data state. This variation is particularly effective for interface design, API documentation, or when focusing on service contracts between components.
Extending Detail (Adding Compartments)
Conversely, a class box can be extended with additional compartments (a fourth section below operations) to show specialized information that doesn’t fit neatly into attributes or operations.
-
Explicit Responsibilities: Adding a compartment for responsibilities is highly effective for clarifying the “contract” of a class. It explicitly states the obligations the class has toward others (e.g., “Must validate user input,” “Must log all transactions,” “Must notify the Warehouse subsystem”), which is incredibly useful during the design phase, code reviews, and when onboarding new team members.
-
Constraints or Notes: Additional compartments can also be used to document business rules, validation constraints, or other notes that provide context for the class’s behavior.
Practical Visual Paradigm Examples
Visual Paradigm is a professional UML modeling tool that offers a rich set of features for creating, editing, and collaborating on class diagrams. Unlike text-based tools like PlantUML, Visual Paradigm provides a visual drag-and-drop interface, real-time collaboration, code engineering capabilities, and extensive customization options. Below are examples demonstrating how to implement the concepts discussed above using Visual Paradigm.
Example 1: The Standard 3-Compartment Class
This is the default, fully detailed view showing the name, attributes, and operations. In Visual Paradigm, you can create this by dragging a “Class” shape from the palette onto the diagram canvas and then adding attributes and operations through the property panel or by directly editing the shape.
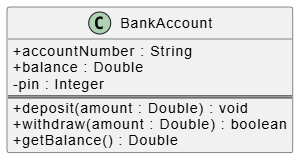
Steps in Visual Paradigm:
-
Open Visual Paradigm and create a new Class Diagram.
-
Drag a “Class” shape from the Palette onto the canvas.
-
Double-click the class name field and enter
BankAccount. Visual Paradigm will automatically format it in bold. -
Right-click the class and select “Add > Attribute” to add attributes:
-
+ accountNumber : String -
+ balance : Double -
- pin : Integer
-
-
Right-click the class and select “Add > Operation” to add operations:
-
+ deposit(amount : Double) : void -
+ withdraw(amount : Double) : boolean -
+ getBalance() : Double
-
-
Visual Paradigm automatically renders the three compartments with proper formatting.
Key Benefit: Visual Paradigm ensures consistency in notation and allows you to easily modify visibility, types, and other properties through intuitive dialogs rather than manual text editing.
Example 2: Minimalist Variations (Less Detail)
Here we show a class with only its name, and another with only its name and operations. These variations are useful for high-level diagrams where implementation details are secondary to structural relationships.

Steps in Visual Paradigm:
For Name Only:
-
Drag a “Class” shape onto the canvas.
-
Enter the class name
PaymentGateway. -
Do not add any attributes or operations. Visual Paradigm will display only the top compartment with the bold class name.
For Name and Operations Only:
-
Drag a “Class” shape onto the canvas.
-
Enter the class name
TransactionProcessor. -
Add operations only (no attributes):
-
+ processPayment(card : CreditCard, amount : Double) : Receipt -
+ refund(transactionId : String) : boolean -
+ getStatus() : String
-
-
Visual Paradigm will display the top compartment (name) and bottom compartment (operations), omitting the middle compartment since no attributes are defined.
Key Benefit: Visual Paradigm allows you to toggle the visibility of compartments dynamically, making it easy to switch between detailed and minimalist views without recreating the diagram.
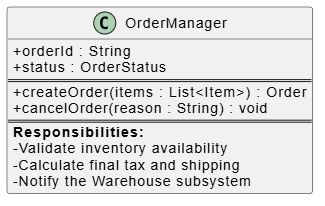
Example 3: Extended Compartment for Responsibilities
Here we use Visual Paradigm’s support for custom compartments to create a distinct fourth section dedicated to the class’s explicit responsibilities. This is particularly useful for documenting design contracts and ensuring clarity during code reviews.
Steps in Visual Paradigm:
-
Create a class named
OrderManagerwith attributes and operations as shown in previous examples. -
To add a responsibilities compartment, right-click the class and select “Format > Show/Hide Compartments” or use the property panel to enable additional compartments.
-
Alternatively, you can use the “Note” or “Tagged Value” feature to attach responsibilities to the class, or manually add a text block within the class shape if your version of Visual Paradigm supports custom compartment content.
-
Enter the responsibilities:
-
Responsibilities:
-
Validate inventory availability
-
Calculate final tax and shipping
-
Notify the Warehouse subsystem
-
-
-
Format the responsibilities section with bold headers and bullet points for readability.
Key Benefit: Visual Paradigm’s flexibility allows you to extend the standard notation to meet your team’s specific documentation needs, ensuring that critical design decisions and contracts are explicitly captured in the diagram.
Advanced Tips for Using Visual Paradigm
-
Code Engineering: Visual Paradigm supports round-trip engineering, allowing you to generate code from UML class diagrams and vice versa. This ensures that your diagrams stay synchronized with your codebase.
-
Collaboration: Use Visual Paradigm’s Teamwork Server or cloud-based collaboration features to work on diagrams with your team in real time, track changes, and manage versions.
-
Templates and Styles: Create custom templates and styles to enforce consistent notation across your organization. This is particularly useful for large teams or enterprises with established modeling standards.
-
Integration: Visual Paradigm integrates with popular IDEs (e.g., Eclipse, IntelliJ IDEA) and project management tools, enabling seamless workflow between design and implementation.
-
Export Options: Export your diagrams in various formats (PNG, SVG, PDF, etc.) for inclusion in documentation, presentations, or wikis.
Conclusion
The UML class box is much more than a rigid set of rules; it is a versatile communication tool that enables software professionals to articulate design intent clearly and efficiently. By mastering the standard three-compartment notation—bold class name, attributes, and operations—you establish a strong foundation for your software designs.
However, the true power of UML lies in its flexibility. By knowing when to strip away details for a high-level architectural overview, or when to add an extra compartment to explicitly define a class’s responsibilities, you can create diagrams that perfectly match the needs of your audience. Tools like Visual Paradigm elevate this process by providing a professional, feature-rich environment for creating, managing, and collaborating on UML diagrams. With its visual interface, code engineering capabilities, and extensive customization options, Visual Paradigm empowers teams to treat diagrams as living documentation that evolves alongside their software projects.
Whether you are a seasoned architect or a developer just starting with UML, investing time in mastering the UML class box—and the tools that support it—will pay dividends in clearer communication, better-designed systems, and more effective collaboration across your team.